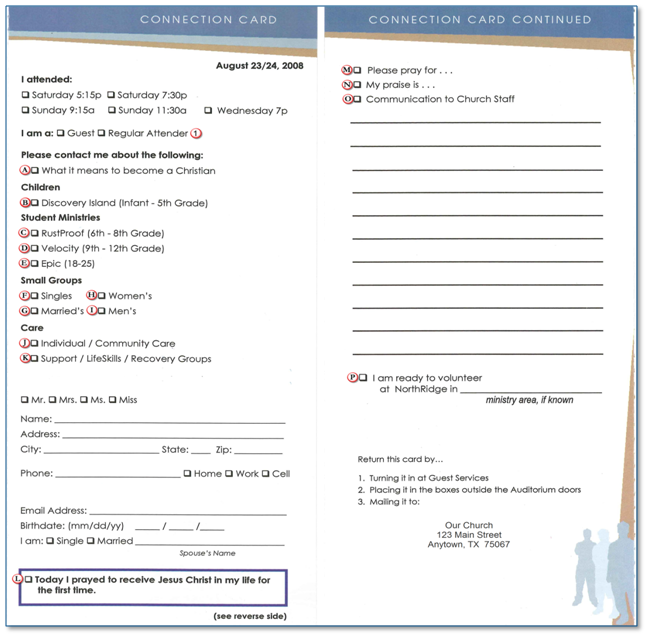
The first step in the contact forms process is to model the contact form. The contact form might be a "Connection Card" or "Guest Registry".
Note: You must have Administrator security rights to perform the following procedure.
The first step in creating a contact form is to create the name of the form.
To create a form name
Contact ItemsData points that represent a discreet piece of information to request from or give further information to the church. Items are typically found on paper forms such as a guest registry or communication card. are the individual action items on the contact form. Each item probably has a different action and some items may have more than one. For example, a "First Time Visitor" or "Guest" option on a card may trigger a welcome letter and a personal phone call. You have the freedom to enter as many items into Fellowship One as necessary to complete a request. Just because there is only one item represented on the card, does not mean there has to be only one item in Fellowship One. A "First Visit" item on your card may translate into a "First Visit Letter" and "First Visit Call" contact items in Fellowship One.
Additionally, you may want to have the option to track some non-actionable information - such as the service time the person attended. There is no need to create service times as contact items, you will have the opportunity to associate service times with your contact forms in the final step of this procedure.
To create contact items
Note: These types are used internally in Fellowship One for sorting and reporting purposes only.
Note: If you do not see the person responsible in the list, check to make sure the person has at least Read security access to the ministry you selected in the Ministry drop-down list.
In some cases you may have items that are worked by more than one person. For example, a pastoral care type contact item may need to be routed to the appropriate pastor depending upon several factors (age, gender, marital status, nature of request). It's best to assign the contact item to a single point person. This person can read the contact request notes and determine where it needs to go. A transfer option is available when working contact items.
One really great feature in the contact form setup process is that a single contact item may be reused again and again on several forms. For example, a "guest" or "first time visitor" contact item may always go to the same person no matter which event/activity generated the contact. However, what about a contact item like "Today I prayed to receive Christ"? This item may need to go to different ministers depending upon the context. For example, if a student selects this item, it may need to be routed to the youth pastor; while an adult selecting this option may need to be routed to the men's or women's pastor. If this is the case for your church, you may want to create different contact items: Prayed to accept Christ - Youth and Prayed to accept Christ - adult.
In the final step, you will combine the two previous steps to create your contact forms.
To create the form
Note: Fellowship One builds schedules out 4 months into the future at any given time. Make sure you set yourself a calendar appointment as a reminder to come back into this form and add future dates. Additionally, you can clean up old dates from the box on the right side of the screen by selecting past dates and then clicking <<Remove.
Tip! Some churches like to capture data on how a person heard about the church for marketing purposes. You can create an individual attribute group called "How you heard" and individual attributes such as TV ad, Radio ad, Billboard, Friend, Newspaper, Phone book, etc. These can be associated with your contact form so you can quickly capture this information as you are entering contacts.
Your contact form is now complete and ready to use! Follow these steps for each paper contact form used at your church.
Next, let's look at contact data entry.